Checkout first step is the single most useful checkpoint to instrument before you spend serious money on influencer traffic, because it tells you whether people who click are actually starting to buy. If you only measure clicks, you can mistake curiosity for intent and scale the wrong creators. If you only measure purchases, you miss where the funnel breaks and you cannot fix it. In practice, the first checkout step is where influencer traffic either turns into a real shopper or disappears. This guide shows how to define the event, calculate conversion rates, diagnose drop offs, and use the data to negotiate and optimize creator partnerships.
What “Checkout first step” means in an influencer funnel
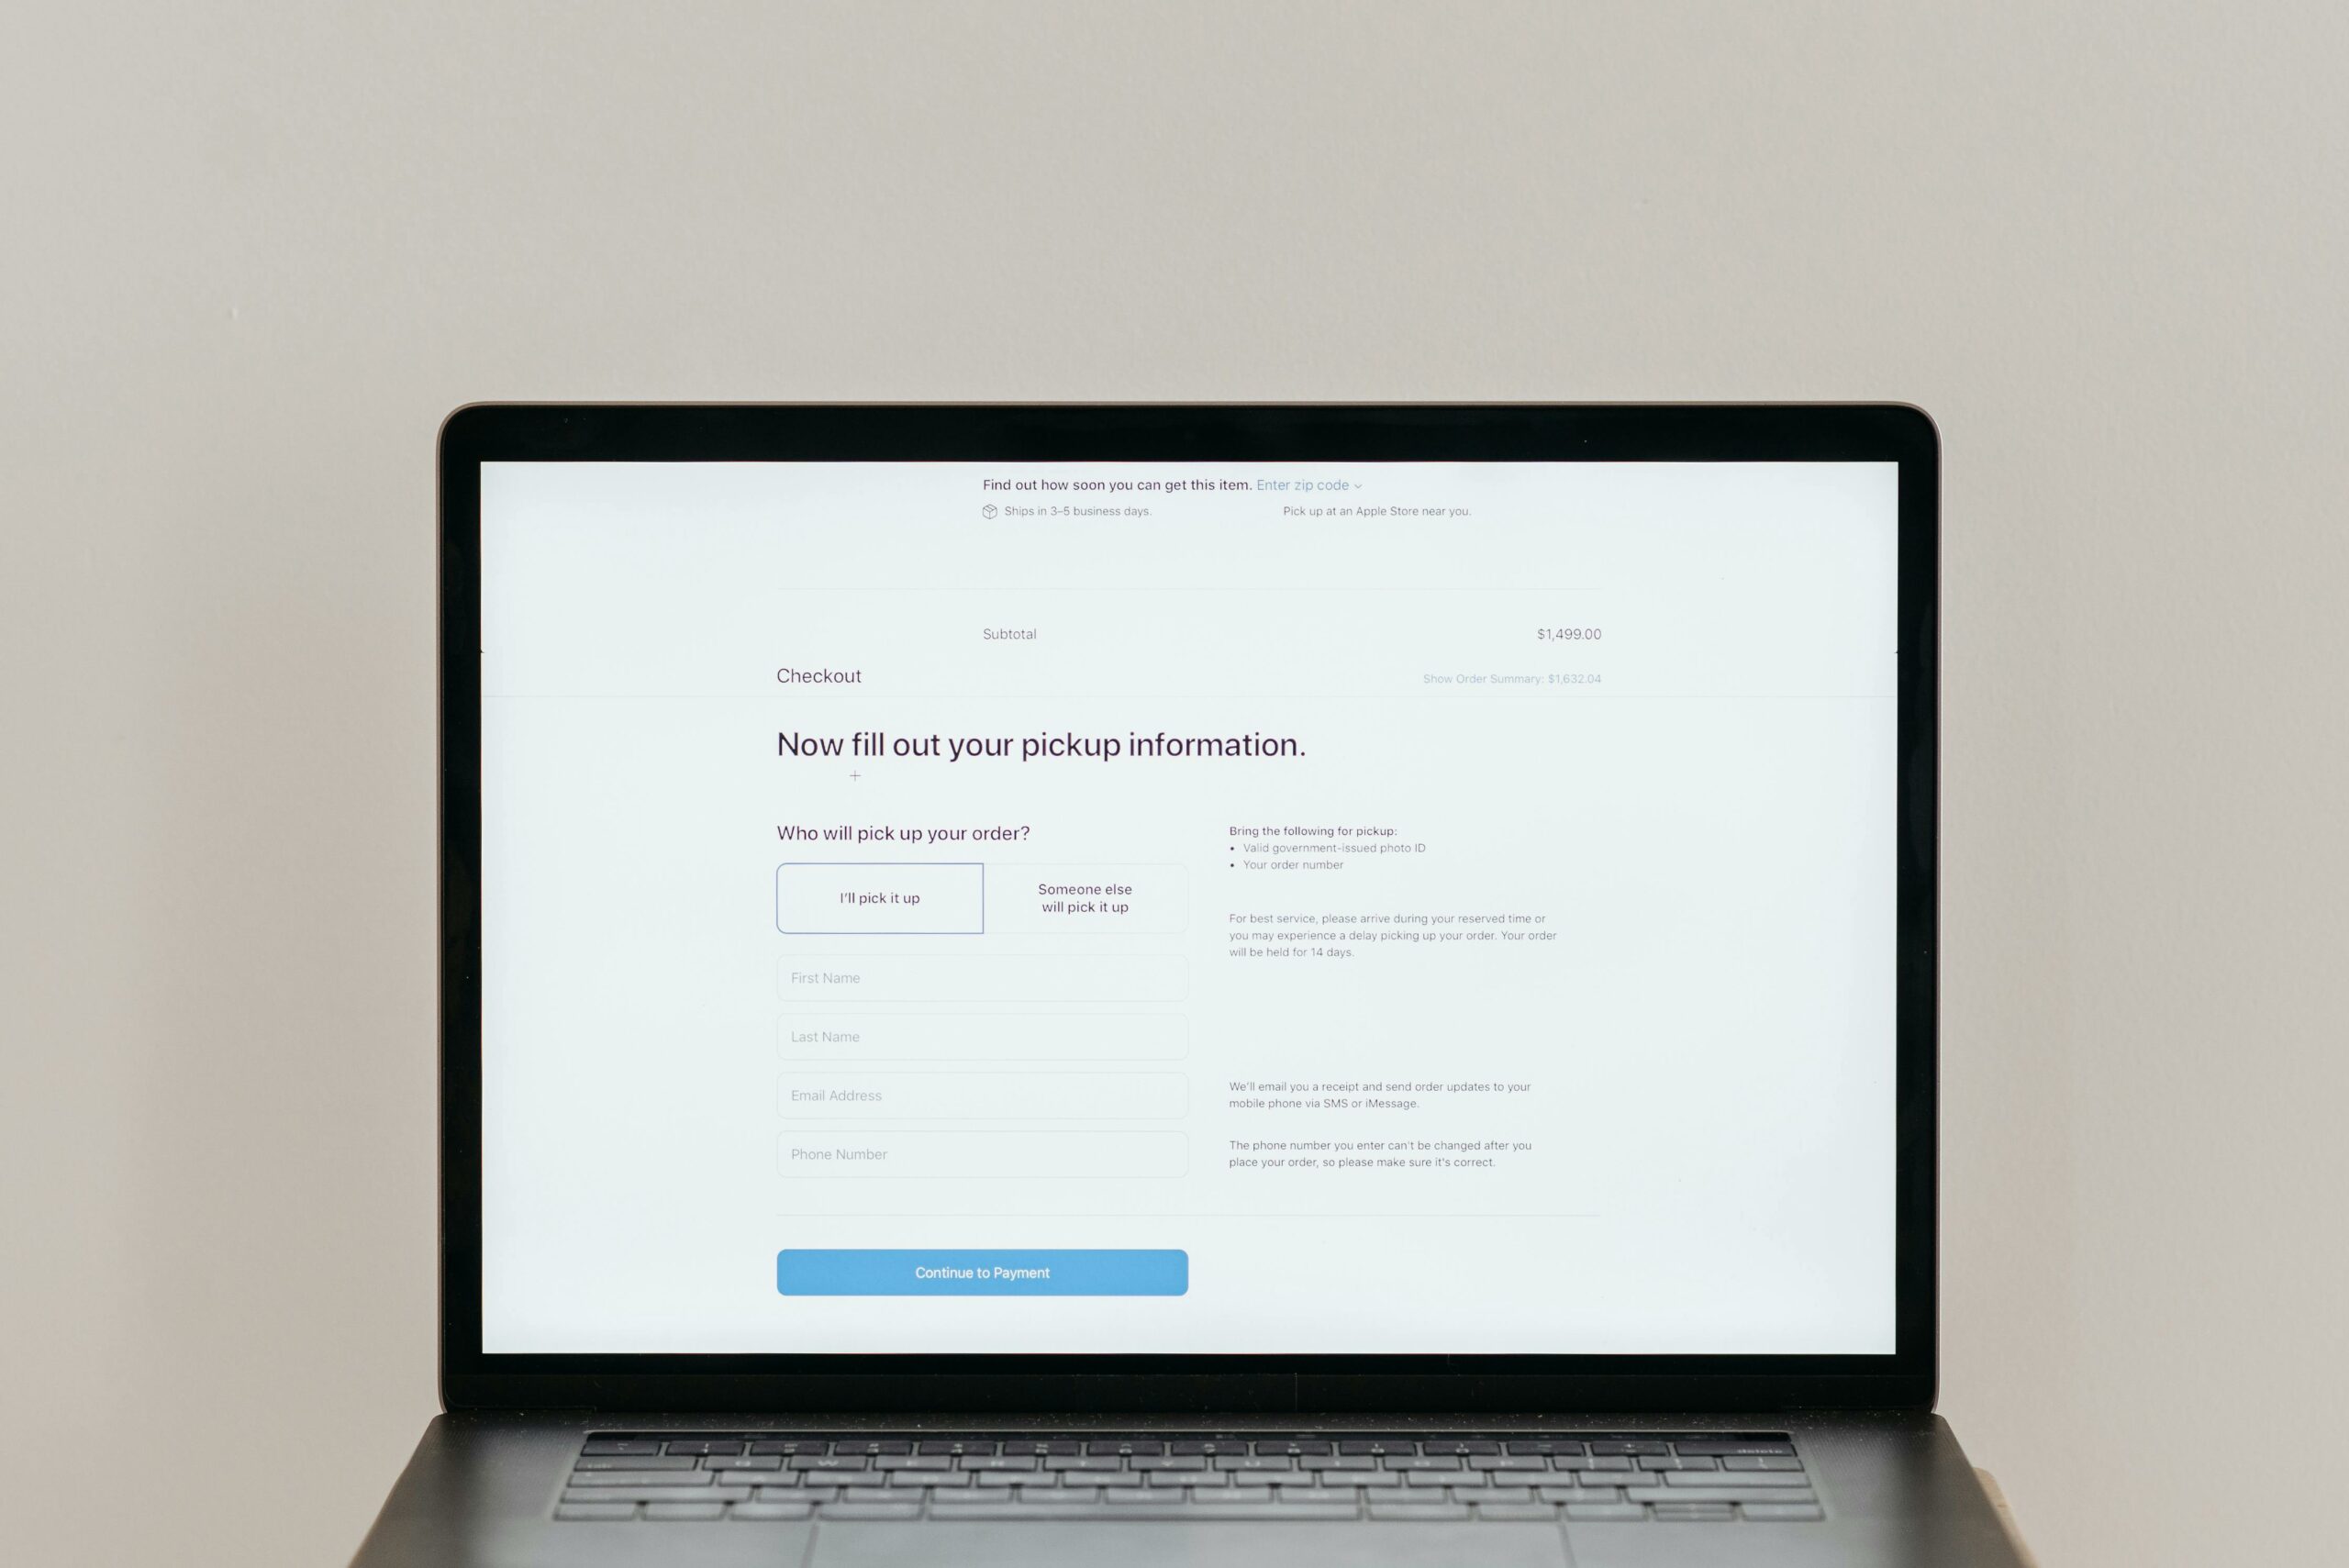
Most influencer campaigns push people from a social platform to a landing page, then to product pages, and finally into checkout. The checkout first step is the first measurable action inside checkout, such as “begin checkout,” “enter shipping,” or “continue to payment,” depending on your platform. It matters because it is closer to revenue than a click, yet early enough that you can still fix issues like shipping sticker shock or confusing forms. As a rule, treat it as your “intent event” for influencer traffic. If your checkout is one page, define the first step as “checkout page view” plus a required interaction like “start checkout” to avoid counting accidental loads. Concrete takeaway: write down your exact event definition and keep it consistent across campaigns so your benchmarks stay comparable.
Before you go further, align on key terms you will use in reports and contracts:
- Reach – unique people who saw the content.
- Impressions – total views, including repeats.
- Engagement rate – engagements divided by reach or impressions (state which one you use).
- CPM – cost per thousand impressions: spend / impressions x 1000.
- CPV – cost per view (often for video): spend / views.
- CPA – cost per acquisition (purchase or lead): spend / conversions.
- Whitelisting – brand runs ads through a creator’s handle (also called creator licensing).
- Usage rights – permission to reuse creator content on your channels and ads for a defined period.
- Exclusivity – creator agrees not to work with competitors for a set time and category.
How to instrument the checkout first step (so the data is trustworthy)
Instrumentation is where most teams lose the plot. You need one clean event that fires once per session when a user truly starts checkout, plus parameters that let you segment by creator, platform, and landing page. Start with your analytics stack: GA4, your ecommerce platform analytics, and your ad platform reporting. Then ensure your influencer links carry consistent UTM parameters and, if possible, a creator ID. Google’s own guidance on building UTM parameters is a good baseline for consistency: Campaign URL builder and UTM best practices.
Use this practical setup checklist:
- Define the event: “begin_checkout” (or equivalent) with a clear trigger.
- Deduplicate: fire once per session, not on every step refresh.
- Pass attribution: UTMs, click IDs where allowed, and a creator parameter (for example, utm_content=creatorname).
- Validate: test on mobile and desktop, logged in and guest, and with discount codes applied.
- QA reporting: compare event counts to checkout page views to catch overfiring.
If you are using whitelisting, keep paid and organic separated in your naming. Otherwise, creator posts and creator ads blend together and you cannot tell what actually drove the checkout first step. Concrete takeaway: create a naming convention document and enforce it in every brief and link generator. For more measurement and campaign planning templates, keep a running reference in the so your team uses the same standards.
Benchmarks and formulas: turning checkout first step into decision metrics
Once the event is reliable, you can compute metrics that help you decide which creators to scale. The most useful are (1) click to checkout first step rate, (2) checkout first step to purchase rate, and (3) cost per checkout start. Together, they separate “good traffic” from “good offer” and “good checkout.” Use simple formulas and keep them visible in your reporting sheet.
- Click to checkout first step rate = checkout first step events / link clicks
- Checkout first step to purchase rate = purchases / checkout first step events
- Cost per checkout start = spend / checkout first step events
- Estimated revenue per checkout start = AOV x (purchases / checkout first step events)
Example calculation: You pay $2,000 for a creator integration. It drives 1,600 tracked clicks, 160 checkout first step events, and 24 purchases with a $60 AOV. Click to checkout first step rate is 160/1600 = 10%. Checkout first step to purchase rate is 24/160 = 15%. Cost per checkout start is $2,000/160 = $12.50. Estimated revenue is 24 x $60 = $1,440, so you are underwater on a last click basis. However, if the creator also lifts branded search and email signups, you may still keep them, but you should renegotiate or fix friction before scaling.
| Metric | Formula | What it tells you | Action if weak |
|---|---|---|---|
| Click to checkout first step rate | Checkout starts / clicks | Landing page and product fit | Change landing page, tighten offer, test product assortment |
| Cost per checkout start | Spend / checkout starts | Efficiency of traffic quality | Shift budget to better creators, adjust deliverables, add performance bonus |
| Checkout first step to purchase rate | Purchases / checkout starts | Checkout friction and pricing | Fix shipping, payment options, trust signals, promo code clarity |
| Revenue per checkout start | AOV x (Purchases / checkout starts) | Expected value of a checkout starter | Increase AOV with bundles, improve conversion with reassurance and UX |
Diagnosing drop offs: what to fix when checkout first step is low
When checkout first step is low relative to clicks, you have a pre checkout problem. The fix is rarely “get more clicks.” Instead, audit the path from swipe up to cart with the same discipline you use for paid social. Start by segmenting results by device, landing page, and creator. Influencer traffic is often mobile heavy, so a slow page or a clunky size selector can crater checkout starts. Then compare new versus returning visitors, because creators often introduce new audiences that need more reassurance.
Use this diagnostic sequence:
- Check message match: does the landing page headline match what the creator promised?
- Check price shock: are shipping and taxes shown late, causing abandonment before checkout?
- Check product availability: are the featured items out of stock or missing variants?
- Check mobile UX: can a user add to cart in under 15 seconds on a mid range phone?
- Check trust: reviews, returns policy, and payment badges visible before checkout.
If checkout first step is healthy but purchases are low, the issue is likely inside checkout: too many fields, limited payment methods, or promo code confusion. In that case, run a quick usability test with five people who match the creator’s audience. Concrete takeaway: record a screen capture of the full path from creator link to checkout and annotate every point where a user has to think.
Using checkout first step to price creators and structure deals
Checkout first step gives you a negotiation lever that feels fair to creators because it reflects real buyer intent, not just vanity metrics. You can still pay a base fee for creative and distribution, but add a performance layer tied to checkout starts or purchases. This structure reduces risk for the brand and rewards creators who drive qualified traffic. It also helps you compare creators across platforms without arguing about view definitions.
| Deal structure | Best for | How to use checkout first step | Contract note |
|---|---|---|---|
| Flat fee only | Awareness launches, new creators | Use checkout starts as a post campaign scorecard | Define tracking links and reporting window |
| Flat fee + bonus | Most ecommerce collabs | Bonus tiers at 50, 100, 200 checkout starts | Spell out attribution rules and fraud policy |
| Affiliate commission | Always on programs | Use checkout starts to identify creators to promote to paid retainers | Clarify cookie window and last click rules |
| Whitelisting + fee | Scaling winning creators with ads | Optimize ads to checkout starts, then to purchases | Include usage rights term and ad spend cap |
Decision rule: if a creator’s cost per checkout start is consistently better than your paid social prospecting benchmark, consider whitelisting their content and running it as ads. If it is worse, keep them for awareness or negotiate down the fee. To keep your reporting consistent, document your creator evaluation rubric and update it each quarter in your team knowledge base, alongside other frameworks on the InfluencerDB Blog.
Attribution and reporting: making checkout first step comparable across creators
Attribution is messy in influencer marketing because users bounce between apps, share links, and come back later. Still, you can make checkout first step data useful by standardizing windows and using multiple signals. Start with a primary view: UTMs and last non direct click in analytics. Then add secondary views: discount code usage, post purchase surveys, and platform reported clicks. The goal is not perfect truth, but consistent decision making.
Set these reporting standards:
- Attribution window: choose a fixed window (for example, 7 days click) and keep it consistent.
- Creator mapping: one creator name format across UTMs, codes, and invoices.
- Incrementality check: compare checkout starts during the activation period versus a baseline week.
- Segmenting: new vs returning customers, device, geo, and landing page.
When you publish results internally, show both efficiency and volume. A creator who drives 30 checkout starts at a great cost might be limited by audience size, while another who drives 300 at a slightly worse cost might be your scale partner. Concrete takeaway: build a one page creator scorecard with four numbers – spend, checkout starts, purchases, and revenue – plus one qualitative note about creative fit.
For disclosure and measurement integrity, follow platform and regulator guidance. The FTC’s endorsement guides are the clearest reference for influencer disclosures: FTC Endorsements and Influencer Marketing. Clean disclosure does not just reduce risk; it also improves audience trust, which can lift checkout starts over time.
Common mistakes (and how to avoid them)
Teams often blame creators when the real problem is measurement or checkout friction. Another common error is changing event definitions mid campaign, which destroys comparability. Some brands also over index on discount codes, even though many shoppers do not apply them, especially on mobile. Finally, marketers sometimes optimize for checkout starts without checking purchase rate, which can lead to pushing low intent traffic into checkout.
- Mistake: counting checkout page views as checkout first step. Fix: require a real interaction event.
- Mistake: UTMs differ by creator manager. Fix: generate links from one template and QA weekly.
- Mistake: comparing creators with different landing pages. Fix: standardize landing pages for tests, then branch.
- Mistake: ignoring mobile speed. Fix: run a quick speed audit and compress heavy assets.
- Mistake: paying for exclusivity without measuring lift. Fix: require a baseline and a holdout period.
Best practices: a repeatable framework you can use next week
To make checkout first step a durable KPI, treat it like a product metric, not a campaign afterthought. First, lock the definition and tracking. Next, build benchmarks by platform, creator tier, and landing page type. Then, use the metric to guide creative iterations, not just budget cuts. Over time, you will learn which creator styles drive high intent traffic, such as demos, comparisons, and problem solution narratives.
Here is a practical weekly workflow:
- Monday: QA tracking and confirm all creator links and codes are live.
- Midweek: pull a funnel report (clicks, checkout first step, purchases) and flag outliers.
- Thursday: send creators one actionable note based on data (for example, clarify offer earlier, show sizing, pin link).
- Friday: update your scorecard and decide: scale, fix, or pause.
Decision rules that keep you honest:
- If click to checkout first step rate is low, fix landing page and message match before replacing the creator.
- If checkout first step to purchase rate is low across all creators, fix checkout UX and shipping transparency.
- If one creator has strong checkout starts but weak purchases, test a different product bundle or a clearer incentive with the same creator.
Finally, remember that influencer content is also creative inventory. If a creator reliably drives checkout first step at a competitive cost, negotiate usage rights so you can reuse the content in email, PDPs, and paid social. Keep the terms specific – duration, channels, and whether edits are allowed – and price it separately from the posting fee. That separation makes negotiations cleaner and helps you scale what works without confusing the value of distribution versus production.


